Click Here For Free Blog Backgrounds!!!
Blogaholic Designs
Showing posts with label Misc. crafts. Show all posts

Thursday, July 26, 2012

Inspired by Pinterest!

I have to admit it....I am totally addicted to Pinterest! I mean who isn't? Right? Especially us crafty girls........the inspiration for projects on Pinterest is limitless!  I pinned this tutorial awhile back....So when my friend Kelley posted a challenge the other day to find a project on Pinterest and make it your own.....well I decided to give it a try.

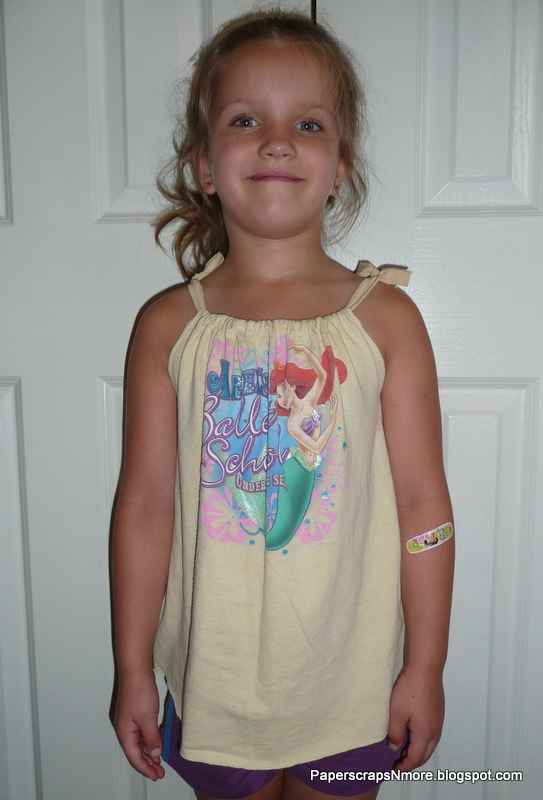
 I grabbed an old play shirt of my grandaughter's (just in case I ruined it) and I cut the shirt following the instructions below. I will say that it is important to use a very sharp pair if scissors! The rest of the instructions to complete this project can be found by clicking on the tutorial above.


Now I may be crafty but sewing is definately NOT my forte......but the sewing machine was cooperating and I managed to complete this little project in about 15 minutes! It was super easy! And my grandaughter, Gracie just loves her NEW Ariel tank top! Isn't she a cutie? 


Thursday, May 17, 2012

Chunky Charm Bracelet

I have another handmade item today that I made for CoyoteKim to go along with the "Whats in your vintage purse" swap. As you all know by now the theme for this swap was "Paris", and we were to not only alter a purse and fill it with goodies but also make some handmade items. I figured by now that Kim had enough Chunky charms in her collection from all the charm swaps she has participated in.......so I decided to make her a charm bracelet instead. I bought the chain and the toggle closure at Michael's......and then was able to find all these cute "Paris" charms at M's and Hobby Lobby! The charms include a tiny carriage, Umbrella, a heart charm with a cameo, an Eiffel tower, a fan, a ladies boot and a suitcase. This charm bracelet was actually easier to put together and quicker than making the chunky charms we all love! some of you may recognize the design on the background card......I inked it and de-bossed it with my letterpress printing plates, and then wired the charm bracelet to the card. Thanks for looking!

Friday, February 17, 2012

Doily Bird Nest

Hi Everyone! I wanted to share this cute little project I made with you today! I was in a Valentine swap with CoyoteKim and part of the swap was that we were to use the Theme of birds and nests in our handmade goodies for each other So.........I found this tutorial on how to make a bird nest from a small doily and decided to give it a try, although I did alter the instructions a bit. This is the final product.....Isn't it cute?


I started with a small white doily.


Then I steeped a tea bag in a cup of boiling water to make my tea dye. Submerged the doily in the dye and left it for approx 1 hour. Then rinsed in cold water to set. Laundered and dried.


Next I gathered up my supplies: Stiffy fabric stiffener, two glass bowls, a metal bowl  and wax paper.


Following the instructions on the bottle of "Stiffy".....I placed the doily into the metal bowl and then slowly added the fabric stiffener......you want to work the stiffener into the doily until it is good and saturated. Gently squeeze out the excess liquid.


I then formed the doilies over the glass bowls and placed them onto a wax paper covered pan. Let them dry for at least 24 hours before removing them from the bowls

The following day after they were good and dry I hot glued shredded paper into the center of the doily
to form the bird nest.(You could crimp & shred book pages, Kraft paper or anything you like for this step) Added a few feathers and three handmade eggs.


For the eggs I simply formed an egg shape with aluminum foil........covered with Fimo clay and baked.
When they were cooled I splattered the eggs with brown acrylic paint! This little project was very easy and turned out super cute! Give it a try!

Sunday, April 3, 2011

Graphic 45 ~ Fairy Cottage

I purchased this Graphic 45 "Springtime Collection" paper recently to use on a paint can I made for a swap I was in over on the Cricut message board. I love all the Graphic 45 lines, but I think this fairy paper is my favorite, and since I had a little leftover after making my paint can.....I thought I would put it to good use and make this Fairy cottage for my Grandaughter Willow. Willow is ten years old and her favorite thing is "all things fairy" including but not limited to Tinkerbell! It warms my heart that she still has the innocence to "BELIEVE".

So I set out to gather supplies: A Shoebox, Graphic 45 paper, sticky backed Cork paper (for my floor) Hot glue gun, Flowers, beads, some twigs, elephant ear seed pods, acorns, pine cones, birds nests, and a bag of Moss and I started this little project. The base of the Fairy cottage is just a Shoebox turned sideways and glued to it's lid, painted and then decorated. One of my favorite Elements is the Tim holtz bird cage....I made this by printing a picture I found online onto shrinky dinks paper and then cutting it out and heating it with my heat gun. I then blinged it up a little with some misc findings I had laying around to make the hanger.


 I also made the little table and benches.....I used white chipboard, inked it brown, then stamped with my woodgrain rubber stamp, and hot glued twigs on the underside for stability and the little legs. The bowl in the middle of the table is an Acorn top turned upside down with fake berries glued in. My "chandelier" is just a beaded pic I wired to the ceiling.


when Willow was a baby we nicknamed her "Bug" because she was no bigger than a little bug! LOL! And she has collected Lady bugs her whole life because of her nickname.....so of course I had to add a few ladybugs hidden here and there for her.


As you can see......I basically covered the whole roof, back and sides of the cottage with various types of moss, seed pods, pine cones, flowers etc.
I took the Fairy Cottage to Willow this morning and she fell in Love with it! She was so Excited that I had made this just for her! She immediately took it into her room and put it on her dresser.....and then set out to find a seashell to use for a bowl , so she could gather food and supplies to leave in her cottage for tonight when the "fairies" come to visit!
Willow will know they stopped by to visit........because as we all know.....the fairies will take the food and  leave behind a glitter trail that she will find in the morning!
This may not be the greatest most artisistic thing I have ever created with my scrapbook supplies..........but it Is one that I am Most proud of......and one Willow will Cherish for a long time to come!

And as the seasons come and go, here's something you might like to know. There are fairies everywhere: under bushes, in the air, playing games just like you play, singing through their busy day. So listen, touch, and look around - in the air and on the ground. And if you watch all nature's things, you might just see a fairy's wing. ~Author Unknown