


Showing posts with label Altered items. Show all posts
Showing posts with label Altered items. Show all posts
Thursday, July 19, 2012
G-45 Old Curiosity Shoppe altered frame


Friday, July 13, 2012
Old Curiosity Shoppe Altered items

Monday, July 9, 2012
G-45 Old Curiosity Shoppe Altered mini Canvas & easel
My friend Kelley Rooks from the CMB was kind of enough to RAK me a brand new 12x12 stack of the NEW G-45 Old Curiosity Shoppe and the rubber stamp set to match it! Woohoo! Thank You so much Kelley! I love this collection! Anyway, I am also in her "all handmade swap" on the CMB and we are partners. So I decided to make this little altered canvas for Kelley as a "Thank You" and send it along with her other swap items when I mail them out this week!

Thursday, May 10, 2012
Altered mini Canvas & Easel

Today I wanted share another one of the altered items I made for CoyoteKim for the "whats in your vintage purse" swap. This is a mini canvas and easel I altered with the My Minds Eye Lost & Found 6x6 paper stack. I believe this collection is called Madison Avenue. I'm not a big "pink" lover but I really like this paper stack with all the vintage dress forms, newsprint etc. and thought it would be perfect for this little canvas. I started off by painting the canvas with Pink Acrylic paint. Then I took one of the newsprint pages from the stack, cut it slightly smaller than the canvas and inked it with pink & brown ink with my blending tool. Next I tattered the edges with my Tim Holtz paper distress tool, and then inked the edges brown. I also cut another piece of paper from the stack with the dress form and sewing machine image (I think I cut this at approx 2x3 inches) and once again used my blending tool to add a little bit of pink and brown ink, tattered the edges etc. The flowers are from my stash and are Recollections and then I added the vintage sewing needle tag, a few stick pins and a sewing needle and a button to finish it off. Super simple project and these little canvas's are sooooo addicting! Can't wait to make another one. Thanks for looking!
Sunday, February 5, 2012
Altered Tin
Today I worked on this Altered tin......I started off with a shiny silver tin that I applied a coat of primer to. Then I started dabbing it with the Ranger Adirondack metallic Copper & Gold dabbers. I loved the look and texture I was acheiving but I wanted this tin to be more aged so I also applied Black & sage green matte acrylic paint until I was happy with the results. When the Acrylic paint was dry I lightly dry misted the entire tin with clear satin Polycrylic by Minwax! Next it was time to Embellish........as you can see I basically used a few Recollections flowers, a pearl spray, an embellished copper paper clip, copper butterfly and a 3d pocket watch I had in my stash. After I adhered everything to the front of the tin I used the Adirondack copper dabber again on the flowers & pocketwatch. I love the way it turned out! I know the pic does not show it well.....but in person it looks like an old and rusty copper tin with a little bit of green patina and age. Inside is also painted the same as the outside and I added a black circle of foam that I glued to the inside bottom of the tin to finish it off! I had so much fun making this tin and getting all messy.......Give it a try and you will be surprised at how awesome the results are! Thanks for looking!

Friday, November 4, 2011
Cardinal Christmas Tag
Here is another tag I worked on today for the Holiday Tag swap! This is my Christmas tag! I have been trying to come up with unusual and new ideas b/c our Hostess is having a contest for the Best tags, most creative etc. So I decided to try and make a journaling card with my MS branch punch! I used K & Company paper for the background, A Glitz clear distressing stamp for the Calender, the Martha Stewart Branch punch for the nest and the Stampin Up bird punch for the Cardinal. I love this tag, it's one of my favorites so far and was super easy to make! I'm still debating if I should add the word "Christmas or Holidays down the right side of the tag".......Hope you like it!


Friday, September 16, 2011
Tim Holtz birdcage!
Embossed metal challenge
My Friend Kim and I are doing a swap through Christmas and we picked items that were either new techniques or a challenge to us. This project incorporates embossed metal. Kim made me this gorgeous altered canvas with embossed metal, a Dress Form and Birdcage. I fell in love with it immediately when I saw it and it sparked something in my imagination to create something for her using the same exact materials she had used. If you would like to see more details about her canvas then please visit her blog: http://littleredshood.blogspot.com/2011/09/grunge-altered-canvas.html

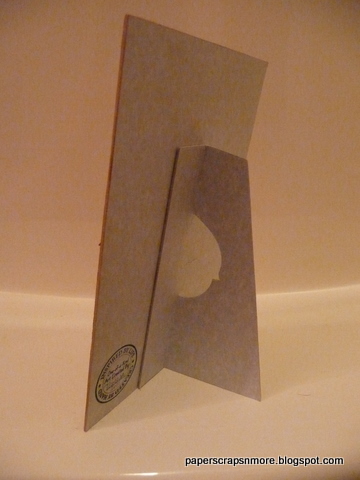
Now onto my project for this challenge! I recently purchased the TH Easel die and have been dying to use it so I decided to cut a piece of Matboard 5"x7" and create this Easel card for Kim! I covered the matboard with paper from the Mariposa stack and then distressed the edges with a heavy grit emery board and brown ink.

I also used the TH birdcage die and the TH alterations dress form die for the stand! The birdcage and stand were cut from a copper colored metal sheet and embossed with the TH patchwork embossing folder and then backed with chipboard to give it some stability.

The Bird itself was cut From the TH Birdcage die with gold colored metal and then heated over a flame to get the cool color changing effect! The pumpkin was handmade by me.....I drew & embossed the pumpkin onto the back of a scrap of gold colored metal with my stylus , then hand cut it out with a pair of scissors and once again held it over a flame for the color changing effect. I then added a small copper leaf and curled a green piece of wire to give the pumpkin some personality!

The flowers and pearl flourishes are Prima. The orange colored gems I used for the birds eye and on the birdcage are recollections from Michael's dollar bin. And the little crown on the birds head was a metal charm I altered with a Dremel tool; I cut the loop off the top and also cut the bottom part of the crown off and then polished it.

I cut the Easel with the TH easel die from matboard and then adhered it to the back of the card with a few strips of red tape.
I hope you enjoy my project today and thanks for looking!
Saturday, August 6, 2011
Timepiece Shadowbox Frame
I wanted to make a nice shadowbox frame & layout to remember my Dad who passed away from Cancer in 1988. My dad loved to restore old cars and he had 1930 Model A that was his pride and joy and I thought it would be awesome to make a vintage layout I could put his picture in..... so I created this layout using the Bo Bunny Timepiece collection papers, the Tim Holtz weathered clock die, misc TH findings & gears and a pkg of Jolees 3d pocket watches. I really like the old fashioned feel of this layout. Now the problem.....I can NOT locate the picture I have of my DAD standing in front of his Model A. So I may end up putting the pic of his car in the designated spot and then putting a smaller pic of him......Not sure yet how I am going to finish this project yet until I am done sorting through all the photos I have but I wanted to go ahead and show you all what I have been working on. Thanks for looking.


Sunday, July 17, 2011
Altered Shadow Box Frame


I found this weathered white washed Shadow Box Frame at Hobby Lobby in the seasonal Isle.
The minute I saw this I knew I wanted to alter it for my Sister in law Dianna and give it to her for her B'day so she could hang it in her pink scrapbook room! I used the Lost & Found paper by My minds Eye ........
I love the bird and the glittered birdcage on this paper. I also used Prima Flowers & some bling of course!
I love the way this paper matches perfectly with this frame. The sentiment reads "Spread Your Wings & Fly"
As you can see I left a space on the top right for Dianna to place a picture if she wants.
Thanks for Looking!
Happy Birthday Di....Love you!
Saturday, June 18, 2011
Altered Cigar Box
I recently stopped in a local smoke shop to inquire about purchasing a few empty boxes......and they gave me a trunk full of these awesome little wooden cigar boxes for free. So I decided to alter this one for myself with the Graphic 45 Le Cirque paper line. I used round wooden balls for the feet....cut the little banner on the top with my Cricut, handmade the rosette and adhered all of it to the box with decoupage of course! The little "Admit One" tickets were another freebie find of mine and I have a whole spool of these tickets, so glad I was able to finally use them on something and they go perfectly with this paper. So anyway, I painted the inside of the box with black acrylic paint and then lined the inside bottom of the box with black felt. I plan to put this box on my shelf in my scraproom to hold all my little keepsakes and goodies that my MB friends send to me.
Hope you like it as much as I do! Thanks for looking!


Hope you like it as much as I do! Thanks for looking!


Altered Wooden thread spool holder
I found this wooden thread spool holder over at Goodwill yesterday for 99 cents believe it or not.....and it was just plain unfinished wood, so immediately my wheels started turning on how I could alter it and what I could use this for in my scraproom. So I purchased this little beauty and brought it home and got started altering it. I started off by completely painting it with black acrylic paint, then I decided to use my all time Favorite paper from Graphic 45. This is one of the Sheets of paper from the Le Cirque collection. I adhered the paper with decoupage, sanded the edges and then applied a nice thin coat of decoupage all over to give it a nice finish. I really didn't want to add too much decoration so I just added pearl flourishes at the top, and then took brown ink and aged the paper to look old. Now that it's finished I plan on going to Michael's and purchasing a bag of unfinished spools and then I want to wrap my cross stitch floss on the spools and store them on this rack. I have tons of floss from when I used to do cross stitch which I now use on buttons and such in my card making and scrapbooking. Because as we all know I am no Suzy homemaker and I don't sew enough to even own this many spools of thread! LOL!!! So anyway, This was my GREAT find for the week and I am super happy with the way it turned out! I think it's going to make an awesome addition to my scraproom! Thanks for looking!


Saturday, May 21, 2011
Altered Letter
CoyoteKim made me this beautiful altered letter "T" for my scrapbook room! I absolutely Love it!
It matches my room perfectly! I will post pics of her letter after she receives it!

Well it seems I forgot to take a picture of Kim's altered letter "K" I made for her, So she sent me a pic!
I made her letter in colors to match her scrap area......Brown, Tan, Pink....and I gave it a vintage look!

Altered Box swap
This is the beautiful box I received in the mail today from my partner Pamela. She used the Graphic 45 Curtain Call papers to alter the box and make all my goodies. Pam you did an awesome job.....I love everything! I will cherish it forever! Thank You so much!


And this is the Cigar Box I altered for Pamela. I wanted to keep the colors light and make a girly box for her to keep all her little momento's over the years from her beautiful little girl. I also made her a swivel charm and a handmade tag. I then made her a satin flower and stickpin that I also included in her box. I did not take a pic of the goodies I sent her... pink stickles, pink embossing powder, some cute little buttons etc that were pink, vintage, tea party etc. And then a few other things. I hope you love your box as much as I love mine!


Subscribe to:
Posts (Atom)

