


Showing posts with label Swaps. Show all posts
Showing posts with label Swaps. Show all posts
Thursday, July 19, 2012
G-45 Old Curiosity Shoppe altered frame


Friday, July 13, 2012
Old Curiosity Shoppe Altered items

Monday, July 9, 2012
G-45 Old Curiosity Shoppe Altered mini Canvas & easel
My friend Kelley Rooks from the CMB was kind of enough to RAK me a brand new 12x12 stack of the NEW G-45 Old Curiosity Shoppe and the rubber stamp set to match it! Woohoo! Thank You so much Kelley! I love this collection! Anyway, I am also in her "all handmade swap" on the CMB and we are partners. So I decided to make this little altered canvas for Kelley as a "Thank You" and send it along with her other swap items when I mail them out this week!

Thursday, May 17, 2012
Chunky Charm Bracelet

I have another handmade item today that I made for CoyoteKim to go along with the "Whats in your vintage purse" swap. As you all know by now the theme for this swap was "Paris", and we were to not only alter a purse and fill it with goodies but also make some handmade items. I figured by now that Kim had enough Chunky charms in her collection from all the charm swaps she has participated in.......so I decided to make her a charm bracelet instead. I bought the chain and the toggle closure at Michael's......and then was able to find all these cute "Paris" charms at M's and Hobby Lobby! The charms include a tiny carriage, Umbrella, a heart charm with a cameo, an Eiffel tower, a fan, a ladies boot and a suitcase. This charm bracelet was actually easier to put together and quicker than making the chunky charms we all love! some of you may recognize the design on the background card......I inked it and de-bossed it with my letterpress printing plates, and then wired the charm bracelet to the card. Thanks for looking!
Monday, May 7, 2012
Part II of the "Parisian Purse Swap"

As Promised here are the details of the inside of the Parisian Purse I made for CoyoteKim in the "Whats in Your Vintage Purse Swap".................this purse was a little on the small side so as you can see I literally stuffed it with all kinds of goodies. I covered the inside of the box with more paper from the DCWV Mariposa stack and created a little pocket on the inside of the lid. All the goodies you see are just tossed in there loose. I sent Kim a bag of the Tim Hotz wire hanger clips, a crystal letter "K" for her to use on a project. A bag of tiny doilies and then a couple larger doilies (that are in the bottom of the box under all the other goodies) the Large white Flower and butterfly are recollections. I also sent her a metal Fleur De Lis, a bag of Paris buttons with cameos, a wooden "eyeglasses" stamp..............and the rest are handmade goodies like the small altered wooden hanger, Key chain and Picture holder clip.


I love this little wooden hanger, Isn't it cute? Why the heck you would have one in your "vintage purse" is beyond me, LOL! But I altered it and added it anyway! Actually Kim had sent me a Large wooden hanger she had altered for me in another swap, so when I found these little ones I decided to make a "smaller version" for her. I covered the hanger with My Minds Eye paper and then sanded and inked the edges, Added the black double bow and then hot glued a Cameo button to the center of the bow. On the back of the hanger I attached a small wooden clothespin so the hanger can serve as a photo holder........the size of this hanger is perfect for a 4x6 photograph.
The next photo clip is one I found at Michael's in the dollar bins, this was the one with the clear acrylic block that had a bright green flower image stamped on two sides. I simply took a paper towel and some Acetone and gently removed the image so the acrylic block would be clear, this worked really well and left no trace behind on the block. Then I wrapped the block in black tulle, tied it with a black ribbon and hot glued a beautiful black flower to the center of the ribbon.

Last but not least is the key Chain I made for Kim's purse. This a "Mix and Mingle" key pendant you can find in the Jewelry section of the craft store. The top of the key twists off so you can add your own beads and decorate the key anyway you like. These keys are intended for the metal lined beads, but I liked these beads better so with a few twists of my bead reamer I was able to make them fit.
Stop back tomorrow and I will post pics of the other handmade Goodies I sent along with this swap that did not fit "INSIDE" the purse! And as always, Thanks for looking! leave me a comment if you'd like!
Saturday, May 5, 2012
Parisian Purse Swap

Today I have the first of several projects I made for Kim, aka CoyoteKim for a "Whats in your vintage purse swap" And the theme for this one was "Paris". I started out with an unfinished wooden purse I purchased at Michael's.....and then I painted it with an antique Gold Acrylic paint, after the gold paint dried I applied a coat of black satin Acrylic......and then I sanded it so the Gold would show through. I had such a hard time finding Paris themed paper and embellishments at my Local Scrapbook stores.......so I ended up using this yummy black paper with the tiny gold fleur de lis from the DCWV Mariposa stack. After I adhered the paper to the purse..........I liked the matte look of the paper with the shiny gold fleur de lis....so I chose to NOT mod podge over the paper on this one. The beautiful background label is also from the same stack......I fussy cut it out and applied it to the front of the purse with Fabri-Tac glue. The flowers are from Recollections and the Eiffel Tower is Jolee's. I made the black butterflies with an EK Success 3D punch. I punched all three layers of the butterfly and then adhered them together in the middle only....and then added antique gold stickles to the body of the butterfly. Then I added a little bling and a butterfly stick pin. (Lots of butterflies on this one.....not sure if butterflies are a "Paris" thing though. LOL but I think they look pretty with the Eiffel tower.)Below I have pics of the top and back of the purse. I will post pics of the inside and the goodies I made to go along with it over the next few days! Thanks for Looking!


Friday, February 17, 2012
Doily Bird Nest
Hi Everyone! I wanted to share this cute little project I made with you today! I was in a Valentine swap with CoyoteKim and part of the swap was that we were to use the Theme of birds and nests in our handmade goodies for each other So.........I found this tutorial on how to make a bird nest from a small doily and decided to give it a try, although I did alter the instructions a bit. This is the final product.....Isn't it cute?

I started with a small white doily.

Then I steeped a tea bag in a cup of boiling water to make my tea dye. Submerged the doily in the dye and left it for approx 1 hour. Then rinsed in cold water to set. Laundered and dried.

Next I gathered up my supplies: Stiffy fabric stiffener, two glass bowls, a metal bowl and wax paper.

Following the instructions on the bottle of "Stiffy".....I placed the doily into the metal bowl and then slowly added the fabric stiffener......you want to work the stiffener into the doily until it is good and saturated. Gently squeeze out the excess liquid.

I then formed the doilies over the glass bowls and placed them onto a wax paper covered pan. Let them dry for at least 24 hours before removing them from the bowls

The following day after they were good and dry I hot glued shredded paper into the center of the doily
to form the bird nest.(You could crimp & shred book pages, Kraft paper or anything you like for this step) Added a few feathers and three handmade eggs.

For the eggs I simply formed an egg shape with aluminum foil........covered with Fimo clay and baked.
When they were cooled I splattered the eggs with brown acrylic paint! This little project was very easy and turned out super cute! Give it a try!
Friday, February 3, 2012
Altered Book swap from CoyoteKim
I just received the most amazing box of goodies in today's mail from my swap partner / partner in crime......CoyoteKim! Some of you who follow her blog may have seen her posts on a few of these items as did I....but I had no idea she had made all these amazing goodies for me! Kim and I have been swapping with each other for quite awhile now and we both like to find new ideas & swaps that challenge us to try new techniques etc. So the premise of this swap was to alter a book for your partner......create a few handmade gifts centered around Birds & nests, something with our initial or name, something altered and something chocolate. We were to also make a charm of some kind in an altered tin. Finally we were to purchase $25.00 worth of gifts from our wishlist. So here is what Kim sent to me.

First of all she sent me this absolutely Gorgeous dress form for my scraproom......LOVE it!

This altered book.......This is so gorgeous in person! Kim actually took an old book and altered it by gluing the interior pages together and then cutting the center of the pages out with an exacto knife, turning this book into a box! (sorry I don't have a good pic of the inside as my camera battery died!) But trust me when I say she did an absolutely amazing job on this book! The exterior is just beautifully altered.....she used Tim Holtz tissue tape on the binding .....black crackle on the rest of the book and then decorated it with lace, flowers, beads,vintage buttons, TH hardware and this beautiful pocket watch! I was literally speechless when I opened this up and started looking at it! And I really thought this was an actual feather on the front of the book........until I looked closer and realized she made the feather from craft cardstock! WOW! LOVE the pen nib on the bottom of the feather! Thank you Kim so much.....I will absolutely treasure this!


The next thing I opened was this adorable box of chocolates.....handmade of course! Kim has all the info on this box here. This is so pretty in person......and she added little chocolates to the inside of all the little boxes for me! YUM!


Next up was my altered Altoid tin and inside she had this beautiful altered key! Once again, If you would like all the details on how Kim altered this tin and what products she used you can find it here. I Love the way she used one of the Tim Holtz keyholes, Metal corner and a fastener hitch to create the little birdcage! How cute is that? And the texture on this is amazing.....it really looks in person like and old vintage tin. And then to top it off she used more of the fastener hitches to create little feet on the tin! So cute! And the Key is gorgeous too......she inked and aged the key to make it look old and then embellished it with paper, beads, a cherish tag and a pen nib! I ♥ it!!


My next item was an altered metal tag with my initial on it! As you can see Kim stamped and embossed the back of the tag giving all this great texture.....and then she decorated the front of the tag with a cream colored button, a little shrinky dink dress form, a tiny spool, pearls & lace! Gorgeous!

Love this little beehive tag! For those of you that know Kim she is on the design team over at the Exploring Cricut blog......and this was one of her DT projects which I loved! check it out here

Next up is this beautiful altered heart. I'm not quite sure how Kim made this but it looks as though she started out with a paper mache heart, embossed aluminum foil with a TH embossing folder and then inked it with alcohol inks...then applied the foil to the heart! This is really gorgeous in person! And of course she then embellished the hell out of it with lace, buttons, pearls, gears ribbon & a key! LOVE, LOVE, LOVE!

And now we come to one of my favorites.....this handmade little birdie! Is this not the cutest thing ever? I am assuming Kim used a pattern and cut the base of the bird out of felt, stuffed and sewed him. Then she made the wings and crown from cardstock, and then added some bling and dangles! When I opened this up I knew immediately this little birdie was going in my new Birdhouse I just purchased for my scraproom!

Here he is in his new home! Gorgeous! Now I can finish altering and decorating my birdcage!

Last but not least are my final goodies Kim sent me from my wishlist.........a three pack of TH dabbers in Gold, Silver & Copper, which I can not wait to play with! An awesome vintage stamp. A Pkg of TH Facets and a Pkg of two ring binders! As you can see Kim spoiled me big time on this one!
I love everything I received in this swap! Thank you so much Kim! Your talent never ceases to Amaze me! I wish I could come up with more adjectives to use.........I feel like I am constantly saying "Amazing, Beautiful & Gorgeous!" But everything you send me is just that.....Amazing, beautiful & Gorgeous!
Thanks for being such a great swap partner and friend!
Monday, November 21, 2011
Birdcage tag swap November 2011
I recently hosted a birdcage tag swap on the Cricut Message board and these are the completed tags I received from all the ladies! Thanks so much for making this a fun and enjoyable swap!
Thursday, October 27, 2011
Holiday Tags Swap
I recently joined the Holiday Tags swap on the CMB that Barb (CricutCrazy) is hostessing and we are to make 4 Holiday tags......an Angel, a Christmas tag, a Snowman & a New Years tag. My partner for this swap is Diane (Doodles) so I hope she likes her tags when she receives them.

This is my Angel tag. The background paper is a sheet of metallic snowflake CS I found at Michaels. I used the Angel Anya stamp from the Greeting Farm to stamp my image and then colored her with Copics & SU markers, used stickles for her angel wings and then cut the oval, the scalloped oval & label at the bottom of the tag with my nestabilities dies. And to finish it off I just added a little bling on her bow and the label, and then two snowflakes I punched from metallic white CS with my MS punches. The little saying at the bottom reads: Whenever a snowman melts away, a snow Angel is added to Heaven that day"...how cute is that?

For my second tag I haven't decided if it is going to be for the Christmas tag or the New Years tag yet. I made this entire tag from the My Minds Eye Lost & Found Christmas paper stack. I love this paper with all the bright red glitter, and Vintage tones! I adhered the background paper to the tag, used the opposite side with the Christmas trees to make the Rosette, punched the Christmas tree out with my one inch circle punch and adhered to the Rosette and then I used red stickles to put berries on the tree. The 2011 little banner I made myself......I stamped the year and then went over it with red stickles once again. And then I added one of the Large Labels from the stack to the top of the tag. The picture below is a photo of the back of this tag.

For this side of the tag I didn't have a coordinating paper for the base of the tag that wasn't glittered so I cut a piece of paper from the Lost & Found "Union Square" collection that I have which tied in nicely. Added a Pocket with a leftover scrap of the Christmas paper I had used on the front of the tag, Cut another strip from scrap and made the little ribbon embellishment & then added one of the round tags over that to embellish the pocket. This stack came with one of the coolest little journaling labels that says "Remember these moments" and has a spot for a picture and journaing.....so I took the label and added it inside the pocket for Doodles to use when she receives this tag. Thanks for looking & Don't forget to leave me a comment!
Tuesday, October 25, 2011
Name Banner Swap

Once again I joined a swap on the CMB, and this time we were to use the Tim Holtz sewing room die and create a name banner for our partner! My partner for this swap was Melody! I used some vintage paper I had in my stash to cover the dress forms and then inked it, added trim, buttons & pearls.The Cameos & Fleur de lis are actually buttons I bought at Michael's and I cut the shanks off! The letters of her name I cut with my Sizzix dies. And to hang the banner I purchased a pkg of nylon washers at Home depot, threaded the ribbon through the holes and then glued it down with Fabri-Tac. Easy Peasy! Thanks for Looking!


Sunday, October 23, 2011
Bottlecap Swap
I recently hosted a Bottlecap Swap on the CMB and I had a great group of Ladies sign up to participate!
Here is the video of all the finished Bottlecaps & tags I received!
Thank You Ladies for making this
a fun and Enjoyable swap!
Friday, September 16, 2011
Tim Holtz birdcage!
Embossed metal challenge
My Friend Kim and I are doing a swap through Christmas and we picked items that were either new techniques or a challenge to us. This project incorporates embossed metal. Kim made me this gorgeous altered canvas with embossed metal, a Dress Form and Birdcage. I fell in love with it immediately when I saw it and it sparked something in my imagination to create something for her using the same exact materials she had used. If you would like to see more details about her canvas then please visit her blog: http://littleredshood.blogspot.com/2011/09/grunge-altered-canvas.html

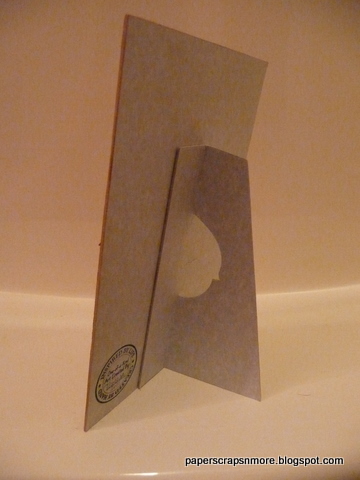
Now onto my project for this challenge! I recently purchased the TH Easel die and have been dying to use it so I decided to cut a piece of Matboard 5"x7" and create this Easel card for Kim! I covered the matboard with paper from the Mariposa stack and then distressed the edges with a heavy grit emery board and brown ink.

I also used the TH birdcage die and the TH alterations dress form die for the stand! The birdcage and stand were cut from a copper colored metal sheet and embossed with the TH patchwork embossing folder and then backed with chipboard to give it some stability.

The Bird itself was cut From the TH Birdcage die with gold colored metal and then heated over a flame to get the cool color changing effect! The pumpkin was handmade by me.....I drew & embossed the pumpkin onto the back of a scrap of gold colored metal with my stylus , then hand cut it out with a pair of scissors and once again held it over a flame for the color changing effect. I then added a small copper leaf and curled a green piece of wire to give the pumpkin some personality!

The flowers and pearl flourishes are Prima. The orange colored gems I used for the birds eye and on the birdcage are recollections from Michael's dollar bin. And the little crown on the birds head was a metal charm I altered with a Dremel tool; I cut the loop off the top and also cut the bottom part of the crown off and then polished it.

I cut the Easel with the TH easel die from matboard and then adhered it to the back of the card with a few strips of red tape.
I hope you enjoy my project today and thanks for looking!
Thursday, August 25, 2011
“Dressed to the Nines” Blog Hop!
Hello! And welcome to the "Dressed to the Nines" Blog Hop!
Thank you for hopping along with us today! This is our first blog hop for the Dress Form tag swap that Jana hosts on the CMB! We are all very excited to show off our creations! And as a "Thank you" for stopping by I am offering a little blog Candy:

One Lucky person will receive this Halloween Dress Form tag kit which includes: Three large tags, Three pieces of halloween patterned cardstock to cover your tags, Three Dress forms cut from heavy duty black mat board, Three dresses (One Orange & two Purple) and a pkg of cute little Halloween Spiders with Witch hats & google eyes to decorate your tags. The rest is up to you! We hope to inspire you along the way to try your hand at making these dress form tags. Along with this kit I will also be sending you one of my COMPLETED Halloween Dress Form tags pictured below.
How to enter for the blog candy:
-You must become a follower of this blog.
-You must leave me a comment Below
-Please remember to leave me an email address to contact you!
I will randomly pick a winner on Monday!
Good Luck !
List of participants in case you get lost along the way:
- Simply My Crafts
- Lil Red’s Craftin’hood
- Planlady19
- The Kraft Lab
- Just Jean’s
- Cindy32 – Guest blogging at Simply My Crafts
- Paper Scraps N More <<<<<<<<<<<<<<<<<<<,You are Here
- Addicted2Paper <<<<<<<<<<<<<<<<<<<<<<<Your Next Stop
- Scrappin Diva
- Scrapping Under the Influence
I signed up for the Dress Form Tag Swap over on the Cricut Message Board and my groups this month were "Television Show/Movie/Famous Person (real, animated, etc" , "Designers Choice" & "Halloween"
So my first tag is for the "famous person" category and I decided to go with "Laverne" from Laverne & Shirley and when I was researching her I came across an old episode of Happy Days where Laverne was wearing a Poodle skirt and dancing with Fonzie at the Diner. So this is my interpretation. For this tag I used the Tim Holtz sewing room die and an SVG file I found on the internet for the Poodle Skirt dress.

For my second tag...the "designers Choice" category I decided since all girls "Love to Shop!" I would make what I call my "Girls Just wanna have Fun!" tag. ha ha I found this awesome Glitter paper at Michaels in the black and the White w/black polka dots and I used the Sizzix Dress Form die on this one. This die comes with the little shoe and the smaller pkg.....but I happened to have another Sizzix die with similar pkgs I used to make the bigger box and I combined them to come up with this. For the white on the smaller box I used my Martha Stewart glitter. The background paper I used on the tag is also Glittered and from the lost and Found collection....so this whole tag is very sparkly! And I am now covered from head to toe in Glitter! LOL!

For my Third Group, the "Halloween" category I decided to do a witch. For this one I once again used my Sizzix dress form die. The dress is made with my favorite black glitter paper and believe it or not the clear overlay for the skirt with the white spider webbing is from a pkg of MS treat bags I had leftover from last year. The belt is is orange glitter ribbon & the neckline I glittered myself with Course MS orange glitter to match. I hand cut the hat myself. Stamped the spider web on the corner of the tag and then applied stickles. The spider is from EK Success. SOOOOO SPOOKY! I love the way this one turned out! ha ha

I hope all the ladies in my groups for this swap like all of my dress form tags when they receive them. If you are visiting my site and have never tried your hand at making these dress form tags, let me tell you they are a lot of fun. Give it a try.....they are super easy to make. Happy Crafting!
I hope you enjoy this hop and we are sure to have another one planned in the near future.
Please stop by all the blogs and leave comments.
If you would like to see more....I have posted the video Below from our FIRST Dress Form Tag swap.
Good luck to everyone and enjoy the rest of your weekend!
Wednesday, August 24, 2011
Dress Form Tag Swap
These are the tags from the FIRST Tim Holtz Dress Form Tag Swap that I participated in over on the Cricut Message Board. We used dress form cuts from the Alterations Sewing Room Die from Tim Holtz. Lots of beautiful tags! Thanks Jana for hostessing this one and for uploading this awesome video of all of our tags!
Thursday, August 18, 2011
Attic treasures chunky charm
This is a chunky charm I made with the Attic treasure's theme for a friend of mine. I used a large TH swivel clasp in antiqued brass, and all the charms are also antiqued brass. The idea was to use charms that represent items you might find in your grandparent's attic. I started off with a beautiful vintage looking pendant I hung from the bottom of the charm and then added a cuckoo clock, vintage key, pocketwatch, camera, old fashioned chair & fan......and also some beautiful brown, cream, copper & green beads. I Love how this one turned out and I hope CoyoteKim is going to Love it as well. I made it super chunky b/c thats the way Kim likes her charms. Now I'm off to make a vintage tag for this charm. Hope you like it! Thanks for looking!


Subscribe to:
Posts (Atom)

