Click Here For Free Blog Backgrounds!!!
Blogaholic Designs

Thursday, October 27, 2011

Holiday Tags Swap

I recently joined the Holiday Tags swap on the CMB that Barb (CricutCrazy) is hostessing and we are to make 4 Holiday tags......an Angel, a Christmas tag, a Snowman & a New Years tag. My partner for this swap is Diane (Doodles) so I hope she likes her tags when she receives them.  


This is my Angel tag.  The background paper is a sheet of metallic snowflake CS I found at Michaels. I used the Angel Anya stamp from the Greeting Farm to stamp my image and then colored her with Copics & SU markers, used stickles for her angel wings and then cut the oval, the scalloped oval & label at the bottom of the tag with my nestabilities dies. And to finish it off I just added a little bling on her bow and the label, and then two snowflakes I punched from metallic white CS with my MS punches. The little saying at the bottom reads: Whenever a snowman melts away, a snow Angel is added to Heaven that day"...how cute is that?

For my second tag I haven't decided if it is going to be for the Christmas tag or the New Years tag yet. I made this entire tag from the My Minds Eye Lost & Found Christmas paper stack. I love this paper with all the bright red glitter, and Vintage tones! I adhered the background paper to the tag, used the opposite side with the Christmas trees to make the Rosette, punched the Christmas tree out with my one inch circle punch and adhered to the Rosette and then I used red stickles to put berries on the tree. The 2011 little banner I made myself......I stamped the year and then went over it with red stickles once again. And then I added one of the Large Labels from the stack to the top of the tag. The picture below is a photo of  the back of this tag. 

For this side of the tag I didn't have a coordinating paper for the base of the tag that wasn't glittered so I cut a piece of paper from the Lost & Found "Union Square" collection that I have which tied in nicely. Added a Pocket with a leftover scrap of the Christmas paper I had used on the front of the tag, Cut another strip from scrap and made the little ribbon embellishment & then added one of the round tags over that to embellish the pocket. This stack came with one of the coolest little journaling labels that says "Remember these moments" and has a spot for a picture and journaing.....so I took the label and added it inside the pocket for Doodles to use when she receives this tag. Thanks for looking & Don't forget to leave me a comment! 

Tuesday, October 25, 2011

Name Banner Swap


Once again I joined a swap on the CMB, and this time we were to use the Tim Holtz sewing room die and create a name banner for our partner! My partner for this swap was Melody! I used some vintage paper I had in my stash to cover the dress forms and then inked it, added trim, buttons & pearls.The Cameos & Fleur de lis are actually buttons I bought at Michael's and I cut the shanks off! The letters of her name I cut with my Sizzix dies. And to hang the banner I purchased a pkg of nylon washers at Home depot, threaded the ribbon through the holes and then glued it down with Fabri-Tac. Easy Peasy!  Thanks for Looking!


Sunday, October 23, 2011

Bottlecap Swap

I recently hosted a Bottlecap Swap on the CMB and I had a great group of Ladies sign up to participate!
Here is the video of all the finished Bottlecaps & tags I received! 
Thank You Ladies for making this
a fun and Enjoyable swap!


Tuesday, September 20, 2011

Halloween Layout

I have been so busy doing swaps on the CMB that I haven't taken any time lately to work on scrapbook layouts....... so I decided to dust off my Expression and get busy!I cut the witches Couldron, the frog, the witch hat and the spider web from the Mini Monsters cart. The paper is from the Recollections Halloween stack. 
The part of the title that says "ghouls Just want to have" is also Recollections 3D stickers, And I cut the word "FUN" and the tags with my Sizzix dies! The spider webbing on the sides of the photo mat is a MS deep edge punch! 

I also used some black stickles, a sticker, a sparkly spider, brads etc.....that I had in my stash!


So anyway, the whole idea in my mind for this layout was that while doing a spell & stirring her potion in the couldron...the witch accidentally turned herself into a frog! LOL!


Hope you like it! And as always Thanks for stopping by and looking at my projects!


Friday, September 16, 2011

Tim Holtz birdcage!

Embossed metal challenge 
My Friend Kim and I are doing a swap through Christmas and we picked items that were either new techniques or a challenge to us. This project incorporates embossed metal. Kim made me this gorgeous altered canvas with embossed metal, a Dress Form and Birdcage. I fell in love with it immediately when I saw it and it sparked something in my imagination to create something for her using the same exact materials she had used. If you would like to see more details about her canvas then please visit her blog:  http://littleredshood.blogspot.com/2011/09/grunge-altered-canvas.html


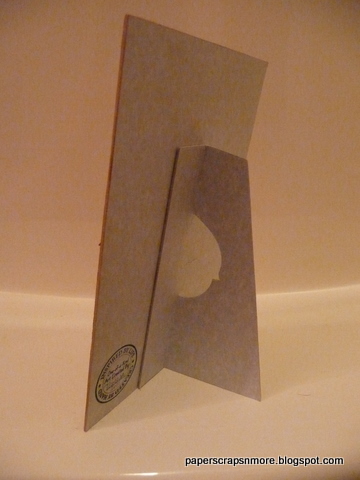
Now onto my project for this challenge! I recently purchased the TH Easel die and have been dying to use it so I decided to cut a piece of Matboard 5"x7" and create this Easel card for Kim!  I covered the matboard with paper from the Mariposa stack and then distressed the edges with a heavy grit emery board and brown ink.

 I also used the TH birdcage die and the TH alterations dress form die for the stand! The birdcage and stand were cut from a copper colored metal sheet and embossed with the TH patchwork embossing folder and then backed with chipboard to give it some stability. 


The Bird itself was cut From the TH Birdcage die with gold colored metal and then heated over a flame to get the cool color changing effect! The pumpkin was handmade by me.....I drew & embossed the pumpkin onto the back of a scrap of gold colored metal with my stylus , then hand cut it out with a pair of scissors and once again held it over a flame for the color changing effect. I then added a small copper leaf and curled a green piece of wire to give the pumpkin some personality!

The flowers and pearl flourishes are Prima. The orange colored gems I used for the birds eye and on the birdcage are recollections from Michael's dollar bin. And the little crown on the birds head was a metal charm I altered with a Dremel tool; I cut the loop off the top and also cut the bottom part of the crown off and then polished it.

I cut the Easel with the TH easel die from matboard and then adhered it to the back of the card with a few strips of red tape.

I hope you enjoy my project today and thanks for looking!


Monday, August 29, 2011

Thank You!

I would like to Thank everyone who joined us for our First "Dressed to Nines" Blog Hop! I really appreciate all the support and wonderful comments! And now ......drum roll please......Congratulations Sandy S you are the winner of my Blog Candy! Woohoo! I will email you for your addy so I can get your goodies in the mail ASAP!
Thanks Again to all who stopped by and participated in the blog hop! 


Thursday, August 25, 2011

“Dressed to the Nines” Blog Hop!

Hello! And welcome to the "Dressed to the Nines" Blog Hop!  
Thank you for hopping along with us today! This is our first blog hop for the Dress Form tag swap that Jana hosts on the CMB! We are all very excited to show off our creations!  And as a "Thank you" for stopping by I am offering a little blog Candy:


One Lucky person will receive this Halloween Dress Form tag kit which includes:  Three large tags,  Three pieces of  halloween patterned cardstock to cover your tags, Three Dress forms cut from heavy duty black mat board, Three dresses (One Orange & two Purple) and a pkg of  cute little Halloween Spiders with Witch hats & google eyes to decorate your tags. The rest is up to you! We hope to inspire you along the way to try your hand at making these dress form tags. Along with this kit I will also be sending you one of my COMPLETED Halloween Dress Form tags pictured below.

How to enter for the blog candy: 
-You must become a follower of this blog. 
-You must leave me a comment Below 

-Please remember to leave me an email address to contact you!
I will randomly pick a winner on Monday! 
Good Luck !


List of participants in case you get lost along the way:


  1. Simply My Crafts
  2. Lil Red’s Craftin’hood
  3. Planlady19
  4. The Kraft Lab
  5. Just Jean’s
  6. Cindy32 – Guest blogging at Simply My Crafts
  7. Paper Scraps N More <<<<<<<<<<<<<<<<<<<,You are Here
  8. Addicted2Paper <<<<<<<<<<<<<<<<<<<<<<<Your Next Stop
  9. Scrappin Diva
  10. Scrapping Under the Influence 


 I signed up for the Dress Form Tag Swap over on the Cricut Message Board and my groups this month were "Television Show/Movie/Famous Person (real, animated, etc" , "Designers Choice" & "Halloween"

So my first tag is for the "famous person" category and I decided to go with "Laverne" from Laverne & Shirley and when I was researching her I came across an old episode of Happy Days where Laverne was wearing a Poodle skirt and dancing with Fonzie at the Diner. So this is my interpretation. For this tag I used the Tim Holtz sewing room die and an SVG file I found on the internet for the Poodle Skirt dress.


For my second tag...the "designers Choice" category I decided since all girls "Love to Shop!" I would make what I call my "Girls Just wanna have Fun!" tag. ha ha I found this awesome Glitter paper at Michaels in the black and the White w/black polka dots and I used the Sizzix Dress Form die on this one. This die comes with the little shoe and the smaller pkg.....but I happened to have another Sizzix die with similar pkgs I used to make the bigger box and I combined them to come up with this. For the white on the smaller box I used my Martha Stewart glitter.  The background paper I used on the tag is also Glittered and from the lost and Found collection....so this whole tag is very sparkly! And I am now covered from head to toe in Glitter! LOL!


For my Third Group, the "Halloween" category I decided to do a witch. For this one I once again used my Sizzix dress form die. The dress is made with my favorite black glitter paper and believe it or not the clear overlay for the skirt with the white spider webbing is from a pkg of MS treat bags I had leftover from last year. The belt is is orange glitter ribbon & the neckline I glittered myself with Course MS orange glitter to match. I hand cut the hat myself. Stamped the spider web on the corner of the tag and then applied stickles. The spider is from EK Success. SOOOOO SPOOKY! I love the way this one turned out! ha ha  


I hope all the ladies in my groups for this swap like all of my dress form tags when they receive them. If you are visiting my site and have never tried your hand at making these dress form tags, let me tell you they are a lot of fun. Give it a try.....they are super easy to make. Happy Crafting! 

I hope you enjoy this hop and we are sure to have another one planned in the near future. 
Please stop by all the blogs and leave comments.
If you would like to see more....I have posted the video Below from our FIRST Dress Form Tag swap.
Good luck to everyone and enjoy the rest of your weekend!