Click Here For Free Blog Backgrounds!!!
Blogaholic Designs

Friday, February 17, 2012

Doily Bird Nest

Hi Everyone! I wanted to share this cute little project I made with you today! I was in a Valentine swap with CoyoteKim and part of the swap was that we were to use the Theme of birds and nests in our handmade goodies for each other So.........I found this tutorial on how to make a bird nest from a small doily and decided to give it a try, although I did alter the instructions a bit. This is the final product.....Isn't it cute?


I started with a small white doily.


Then I steeped a tea bag in a cup of boiling water to make my tea dye. Submerged the doily in the dye and left it for approx 1 hour. Then rinsed in cold water to set. Laundered and dried.


Next I gathered up my supplies: Stiffy fabric stiffener, two glass bowls, a metal bowl  and wax paper.


Following the instructions on the bottle of "Stiffy".....I placed the doily into the metal bowl and then slowly added the fabric stiffener......you want to work the stiffener into the doily until it is good and saturated. Gently squeeze out the excess liquid.


I then formed the doilies over the glass bowls and placed them onto a wax paper covered pan. Let them dry for at least 24 hours before removing them from the bowls

The following day after they were good and dry I hot glued shredded paper into the center of the doily
to form the bird nest.(You could crimp & shred book pages, Kraft paper or anything you like for this step) Added a few feathers and three handmade eggs.


For the eggs I simply formed an egg shape with aluminum foil........covered with Fimo clay and baked.
When they were cooled I splattered the eggs with brown acrylic paint! This little project was very easy and turned out super cute! Give it a try!

Sunday, February 5, 2012

Altered Tin

Today I worked on this Altered tin......I started off with a shiny silver tin that I applied a coat of primer to. Then I started dabbing it with the Ranger Adirondack metallic Copper & Gold dabbers. I loved the look and texture I was acheiving but I wanted this tin to be more aged so I also applied Black & sage green matte acrylic paint until I was happy with the results. When the Acrylic paint was dry I lightly dry misted the entire tin with clear satin  Polycrylic by Minwax! Next it was time to Embellish........as you can see I basically used a few Recollections flowers, a pearl spray, an embellished copper paper clip, copper butterfly and a 3d pocket watch I had in my stash. After I adhered everything to the front of the tin I used the Adirondack copper dabber again on the flowers & pocketwatch. I love the way it turned out! I know the pic does not show it well.....but in person it looks like an old and rusty copper tin with a little bit of green patina and age. Inside is also painted the same as the outside and I added a black circle of foam that I glued to the inside bottom of the tin to finish it off! I had so much fun making this tin and getting all messy.......Give it a try and you will be surprised at how awesome the results are! Thanks for looking!

Friday, February 3, 2012

Altered Book swap from CoyoteKim

I just received the most amazing box of goodies in today's mail from my swap partner / partner in crime......CoyoteKim! Some of you who follow her blog may have seen her posts on a few of these items as did I....but I had no idea she had made all these amazing goodies for me! Kim and I have been swapping with each other for quite awhile now and we both like to find new ideas & swaps that challenge us to try new techniques etc. So the premise of this swap was to alter a book for your partner......create a few handmade gifts centered around Birds & nests, something with our initial or name, something altered and something chocolate. We were to also make a charm of some kind in an altered tin. Finally we were to purchase $25.00 worth of gifts from our wishlist. So here is what Kim sent to me.

First of all she sent me this absolutely Gorgeous dress form for my scraproom......LOVE it!

 This altered book.......This is so gorgeous in person! Kim actually took an old book and altered it by gluing the interior pages together and then cutting the center of the pages out with an exacto knife, turning this book into a box! (sorry I don't have a good pic of the inside as my camera battery died!) But trust me when I say she did an absolutely amazing job on this book! The exterior is just beautifully altered.....she used Tim Holtz tissue tape on the binding .....black crackle on the rest of the book and then decorated it with lace, flowers, beads,vintage buttons, TH hardware and this beautiful pocket watch! I was literally speechless when I opened this up and started looking at it!  And I really thought this was an actual feather on the front of the book........until I looked closer and realized she made the feather from craft cardstock! WOW! LOVE the pen nib on the bottom of the feather! Thank you Kim so much.....I will absolutely treasure this!


 The next thing I opened was this adorable box of chocolates.....handmade of course! Kim has all the info on this box here. This is so pretty in person......and she added little chocolates to the inside of all the little boxes for me! YUM!


 Next up was my altered Altoid tin and inside she had this beautiful altered key! Once again, If you would like all the details on how Kim altered this tin and what products she used you can find it here. I Love the way she used one of the Tim Holtz keyholes, Metal corner and a fastener hitch to create the little birdcage! How cute is that? And the texture on this is amazing.....it really looks in person like and old vintage tin. And then to top it off she used more of the fastener hitches to create little feet on the tin! So cute! And the Key is gorgeous too......she inked and aged the key to make it look old and then embellished it with paper, beads, a cherish tag and a pen nib! I ♥ it!!


 My next item was an altered metal tag with my initial on it! As you can see Kim stamped and embossed the back of the tag giving all this great texture.....and then she decorated the front of the tag with a cream colored button, a little shrinky dink dress form, a tiny spool, pearls & lace! Gorgeous!


Love this little beehive tag! For those of you that know Kim she is on the design team over at the Exploring Cricut blog......and this was one of her DT projects which I loved! check it out here

Next up is this beautiful altered heart. I'm not quite sure how Kim made this but it looks as though she started out with a paper mache heart, embossed aluminum foil with a TH embossing folder and then inked it with alcohol inks...then applied the foil to the heart! This is really gorgeous in person! And of course she then embellished the hell out of it with lace, buttons, pearls, gears ribbon & a key! LOVE, LOVE, LOVE!

And now we come to one of my favorites.....this handmade little birdie! Is this not the cutest thing ever? I am assuming Kim used a pattern and cut the base of the bird out of felt, stuffed and sewed him. Then she  made the wings and crown from cardstock, and then added some bling and dangles! When I opened this up I knew immediately this little birdie was going in my new Birdhouse I just purchased for my scraproom!

 Here he is in his new home! Gorgeous! Now I can finish altering and decorating my birdcage!


Last but not least are my final goodies Kim sent me from my wishlist.........a three pack of TH dabbers in Gold, Silver & Copper, which I can not wait to play with! An awesome vintage stamp. A Pkg of TH Facets and a Pkg of two ring binders! As you can see Kim spoiled me big time on this one!

I love everything I received in this swap! Thank you so much Kim! Your talent never ceases to Amaze me! I wish I could come up with more adjectives to use.........I feel like I am constantly saying "Amazing, Beautiful & Gorgeous!" But everything you send me is just that.....Amazing, beautiful & Gorgeous!
Thanks for being such a great swap partner and friend!

Sunday, January 1, 2012

Day 3.......My newly decorated scraproom!

Okay so here are a few new pics that show my progress in re-decorating my scraproom............as you can see I pretty much kept all my furniture and just re-arranged it a bit.......changed the wall color to this yummy caramel color........added in a few beautiful dress forms, a new lamp and drapes.......and of course I have all my beautiful handmade gifts I have received from my crafty friends displayed now so I can look at them while I scrap and enjoy them! So far the room is looking exactly the way I imagined it ....... so I'm pretty happy with it! Now I just have to get some of my FAV dress form tags framed today and have my hubby finish hanging all my wall decor! Thanks for looking! And Happy New Year to you all!


Friday, December 30, 2011

Day 2 ....... Sneak Peek!

Been working in my scraproom all day today trying to get it set back up and let me tell you......it has been a long and tedious process! UGH! We are only about half way through all the boxes but it's coming along nicely! Here is a sneak Peek of my Newly decorated room with some of my treasures! I found this lamp at Hobby Lobby and fell in love with it! I have some really pretty black trim with tiny roses that I plan on gluing around the edge of the shade as soon as I get done unpacking! Also found the pretty little frame at HL.......I still need to find a pic to put in it though! (it still says Hobby Lobby on it! ha ha) Also my wire dress form I hang my handmade charms from swaps on! And then the other little dress form I found at J's I am using for a pin cushion. The tea cup pin cushion was made for me by my friend Kim Wylie aka CoyoteKim.....which I dearly love! And also my beautiful altered box I received from Pamela Osterday in a swap!


And last but not least is my gorgeous letter "T" that Kim Wylie also made for me..........I finally got it hung on my wall! As you can see from the pics I absolutely cherish all the wonderful gifts I receive from my crafty friends and I am so excited to be redecorating my room with all my treasures! Hope you enjoy the sneak peeks.....I will post more tomarrow! Stay tuned!

Thursday, December 29, 2011

Day 1 of my Scraproom Renovation

Okay so last night my hubby helped me pack up my entire scraproom and move all the boxes into the living room! We then pushed all my furniture in the scraproom to the center of the room. Now time to begin..............Just finished scrubbing walls and about to patch a few small holes where I had pictures previously hung and then we will begin priming the walls for paint! Woohoo! Will take pics and post this evening! Stay Tuned!

Okay so here is a few pics I took of my hubby painting the walls in my room.......I picked out a beautiful caramel color for the walls, and as you can see it is drying pretty dark......but so far I like it! We finished painting all the walls, doors & trim this evening and now we are literally waiting for the paint to dry! ha ha
Gonna start staging the room in the morning and placing all the furniture so I can begin the long process of unpacking all my boxes and re-setting the room back up! Will post again tomarrow!


Wednesday, December 28, 2011

My Scraproom .....Time for a Change!

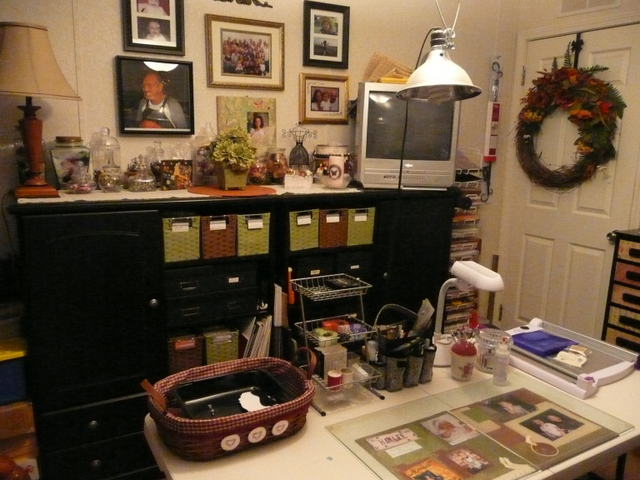
This is what my scraproom looked like for the past couple of years and recently I decided it was time for a remodel and some re-organization, not to mention New decor!! I was getting a little cramped in here and my room was not condusive for scrapping! It definately was not my "Happy place" anymore! Although I am very blessed to have so much...........It has started to look like a craft store threw up in here! ha ha So time for a change! Stay tuned for pics of our progress as we remodel and change things around! I am in the process of packing everything up and emptying out the room this week! I will post pics of our progress as soon as I get everything out of here!