I just received the most amazing box of goodies in today's mail from my swap partner / partner in crime......CoyoteKim! Some of you who follow her blog may have seen her posts on a few of these items as did I....but I had no idea she had made all these amazing goodies for me! Kim and I have been swapping with each other for quite awhile now and we both like to find new ideas & swaps that challenge us to try new techniques etc. So the premise of this swap was to alter a book for your partner......create a few handmade gifts centered around Birds & nests, something with our initial or name, something altered and something chocolate. We were to also make a charm of some kind in an altered tin. Finally we were to purchase $25.00 worth of gifts from our wishlist. So here is what Kim sent to me.
First of all she sent me this absolutely Gorgeous dress form for my scraproom......LOVE it!

This altered book.......This is so gorgeous in person! Kim actually took an old book and altered it by gluing the interior pages together and then cutting the center of the pages out with an exacto knife, turning this book into a box! (sorry I don't have a good pic of the inside as my camera battery died!) But trust me when I say she did an absolutely amazing job on this book! The exterior is just beautifully altered.....she used Tim Holtz tissue tape on the binding .....black crackle on the rest of the book and then decorated it with lace, flowers, beads,vintage buttons, TH hardware and this beautiful pocket watch! I was literally speechless when I opened this up and started looking at it! And I really thought this was an actual feather on the front of the book........until I looked closer and realized she made the feather from craft cardstock! WOW! LOVE the pen nib on the bottom of the feather! Thank you Kim so much.....I will absolutely treasure this!


The next thing I opened was this adorable box of chocolates.....handmade of course! Kim has all the info on this box here. This is so pretty in person......and she added little chocolates to the inside of all the little boxes for me! YUM!
Next up was my altered Altoid tin and inside she had this beautiful altered key! Once again, If you would like all the details on how Kim altered this tin and what products she used you can find it here. I Love the way she used one of the Tim Holtz keyholes, Metal corner and a fastener hitch to create the little birdcage! How cute is that? And the texture on this is amazing.....it really looks in person like and old vintage tin. And then to top it off she used more of the fastener hitches to create little feet on the tin! So cute! And the Key is gorgeous too......she inked and aged the key to make it look old and then embellished it with paper, beads, a cherish tag and a pen nib! I ♥ it!!
My next item was an altered metal tag with my initial on it! As you can see Kim stamped and embossed the back of the tag giving all this great texture.....and then she decorated the front of the tag with a cream colored button, a little shrinky dink dress form, a tiny spool, pearls & lace! Gorgeous!
Love this little beehive tag! For those of you that know Kim she is on the design team over at the Exploring Cricut blog......and this was one of her DT projects which I loved! check it out
hereNext up is this beautiful altered heart. I'm not quite sure how Kim made this but it looks as though she started out with a paper mache heart, embossed aluminum foil with a TH embossing folder and then inked it with alcohol inks...then applied the foil to the heart! This is really gorgeous in person! And of course she then embellished the hell out of it with lace, buttons, pearls, gears ribbon & a key! LOVE, LOVE, LOVE!
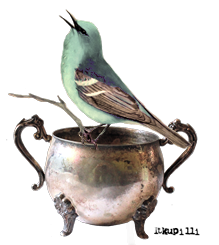
And now we come to one of my favorites.....this handmade little birdie! Is this not the cutest thing ever? I am assuming Kim used a pattern and cut the base of the bird out of felt, stuffed and sewed him. Then she made the wings and crown from cardstock, and then added some bling and dangles! When I opened this up I knew immediately this little birdie was going in my new Birdhouse I just purchased for my scraproom!
Here he is in his new home! Gorgeous! Now I can finish altering and decorating my birdcage!
Last but not least are my final goodies Kim sent me from my wishlist.........a three pack of TH dabbers in Gold, Silver & Copper, which I can not wait to play with! An awesome vintage stamp. A Pkg of TH Facets and a Pkg of two ring binders! As you can see Kim spoiled me big time on this one!
I love everything I received in this swap! Thank you so much Kim! Your talent never ceases to Amaze me! I wish I could come up with more adjectives to use.........I feel like I am constantly saying "Amazing, Beautiful & Gorgeous!" But everything you send me is just that.....Amazing, beautiful & Gorgeous!
Thanks for being such a great swap partner and friend!